SPF & DKIM Setup
Design
As a Salesforce Admin
I want to emails sent from Salesforce to be authenticated using industry standard protocols
So that emails are delivered to the recipient's inbox and not marked as spam

Note: This will be setup using SPF and DKIM and will require changes in Salesforce and the DNS provider
Given an email is sent from an organisation email address via Salesforce
When the email is sent it is authenticated using SPF and DKIM
Then the email is received in the recipient's inbox and not marked as spam
Build
SPF Configuration
In Salesforce (Step 1):
Setup > Email > Deliverability
- Activate bounce management: False
- Enable compliance with standard email security mechanisms: False

Enable compliance with standard email security mechanisms is being disabled as it will be setup using the DNS provider in the following steps. As explained by Salesforce in the first paragraph of the Include Salesforce in Your SPF Record (opens in a new tab) help article
In DNS Provider (Step 2)(Cloudflare, GoDaddy, etc.):
Either create a new TXT record or edit an existing SPF record (there should only be one TXT record that begins with v=spf1). The Picture below shows an example using GoDaddy (opens in a new tab)
-
Option 1 (New spf TXT record):
Add a TXT record with the following values:- Name/Host:
@ - Type:
TXT - Value:
v=spf1 include:_spf.salesforce.com ~all

- Name/Host:
-
Option 2 (Edit existing spf TXT record):
If the DNS already has a SPF record, addinclude:_spf.salesforce.comto the existing record before the last mechanism (~allor-all):
To check if the SPF record is setup correctly, you can use tools like the SPF Record Generator (opens in a new tab).
This can be useful to check the setup without needing login access to the DNS provider.

DKIM Configuration
In Salesforce (Step 1):
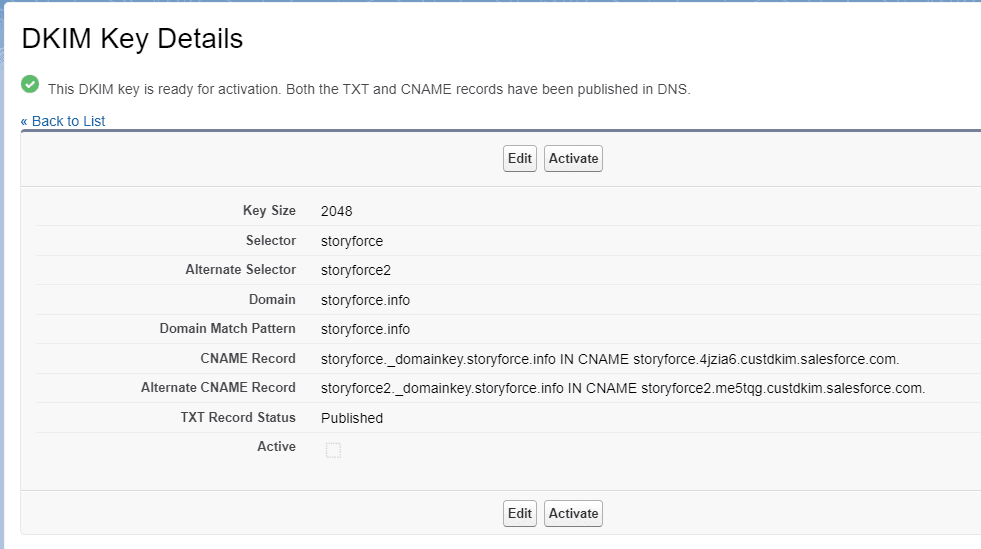
Setup > Email > DKIM Keys
Create a new DKIM key:
- Key Size: 2048
- Selector: add a unique selector (e.g.
storyforce) - Alternate Selector: add another unique selector (e.g.
storyforce2) - Domain: add the domain (e.g.
storyforce.info) - Domain Match Pattern: add the domain match pattern (e.g.
storyforce.info)

In DNS Provider (Step 2)(Cloudflare, GoDaddy, etc.):
Add a new CNAMEs with the keys just generated, the picture below shows an example using GoDaddy (opens in a new tab)

In Salesforce (Step 3):
Once the CNAMEs are added, activate the DKIM key, DNS records can take up to 48 hours to propagate.

Test
Steps
- Send an email from Salesforce to a test email address
- Check the email is received in the inbox and not marked as spam
Expected Results
- The email is received in the inbox and not marked as spam